Urban Hat

Hello!

I haven’t been able to knit much over the last couple of weeks as I have been away at my daughter’s. Before I went, though, I managed to finish a poncho for my two granddaughters, or ‘Princess Cape’ as the four year-old calls it, and a simple, Urban Hat for Niamh, the elder girl. This is the second of these hats I have made for her: one has a pompom, and one does not. When I made the first one, neither my daughter, nor my granddaughter could decide whether they wanted a pompom or not, so my daughter decided that I could make two hats. She is not a knitter. More about the hat, shortly.
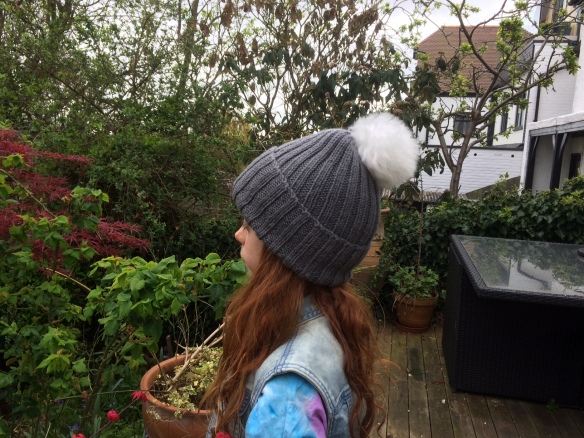
IMG_0908

Urban Hat

Materials:                            100g Aran or Worsted weight yarn

I used Debbie Bliss BFL Aran in Gunmetal (100% BFL wool)

Or: Debbie Bliss Cashmerino Aran

Rowan Wool Worsted

Sublime Aran

4.5mm 40cm circular needles, or double pointed needles; one long (at least 100cm) 4.5mm circular needle if using Magic Loop; a second 40cm circular needle if using two circulars for the crown.

Tension:                               26sts and 26 rows to 10cm (4ins) in k2, p2 rib


Size:                                       One size but see information below about changing the size

The hat will look very narrow while knitting because of the ribbing, but k2, p2 is a very stretchy stitch and a hat that measures about 40cm (14ins) unstretched will easily fit a head measuring 55cm (22ins).

I knitted this hat for a girl with lots of hair and her head measured 53cm (21ins). If I was making this for me, I would add an extra 8 stitches to the total, and for a man with a large head, an extra 12 stitches. The pattern repeat is 4 stitches, so just ensure the total number of stitches cast on is divisible by four. If you wish to make a smaller hat, cast on fewer stitches by deducting multiples of four.

Level of Difficulty:            Suitable for knitters who can knit in the round; can work a simple k2 tog decrease; can work k2, p2 ribbing

Instructions

Using 4.5mm needle of your choice, (see above), cast on 92 sts.

Ensuring sts are not twisted, join to work in the round, placing a marker to denote the beginning of the round.

Round 1 and every round:* k2, p2, rep from * to end.

Rep this round until hat measures 26cm (10.5ins) from cast on edge.

Note: You may wish to change this measurement so the hat is suitable for its recipient. Measure from the base of the ear to the top of the crown, e.g. the measurement for my model was 19cm (7.5ins), then add on the amount of turn up desired on the cuff of the hat. I added on 9cm (3.5ins). For an adult, you may wish to work 10-12cm (4-4.5ins) for the turn up. So, if I was knitting this hat for me, I would probably knit 30cm (12ins) in rib.

Crown shaping: Change to dpns or two circulars as sts dec to make the knitting easier.

Round 1:              * k2, p2tog, rep from * around

Rounds 2 &3:     *k2, p1, rep from * around

Round 4:              *k2tog, p1, rep from * around

Round 5:              *K1, p1, rep from * around

Round 6:              *k2tog, rep from * around

Round 7:               Knit

Round 8:              *k2tog, rep from * around

Round 9:              Knit

Round 10:            *k2tog, rep from * around

Round 11:            Knit

Round 12:            *k2tog, rep from * around. 6sts remain.

Break yarn, leaving a 20cm (8ins) tail. Thread yarn through remaining sts and finish off on inside of hat. Weave in ends.

I washed the hat in Eucalan, wrapped it up in a towel and squeezed hard to remove the excess water. I then laid the hat out on a mat or towel, smoothed out the stitches gently, and placed some empty kitchen roll holders inside the hat to avoid creating fold lines as the hat dried. There is no need to pin or stretch the hat, just a gentle smooth with the hands. Enjoy!


Add a pompom if desired. There are some lovely pure Alpaca ones available at the moment, if a little pricey. Or you can make your own, either using a pompom maker, or the old-fashioned method with cardboard.


Abbreviations

K                             knit

P                             purl

K2tog                    knit two together

rep                         repeat

sts                          stitches

dec                         decrease

dpns                      double pointed needles


I hope you enjoy the hat pattern. If you have any questions about it, please do not hesitate to contact me via the Stash contact form.

If you have any questions about the poncho, or would like to see it as a pattern, please contact me.

As ever, knit on.

Lesley

Copyright, Lesley Conroy 2016

Poncho fit for a princess!

I haven’t been able to knit much over the last couple of weeks as I have been away at my daughter’s. Before I went, though, I managed to finish a poncho for my two granddaughters, or ‘Princess Cape’ as the four year-old calls it.

I loved making the poncho. It was custom designed for both girls, and they had their own input. It shouldn’t be too close fitting around the neck, as neither girl likes that; it must have stripes; it shouldn’t use ‘scratchy’ yarn; and it should be quite long. Robyn, the younger girl, wanted it to reach the floor, but I managed to talk her out of that.  Armed with these instructions, and considerations, I did my best. I used an Aran or worsted weight yarn for the main color, and Noro Silk Garden self-striping yarn for the contrast garter stitch stripes, collar, and border. Suitable yarns for the main would be Debbie Bliss BFL Aran; Debbie Bliss Cashmerino Aran; Rowan Wool Worsted: Sublime Aran; Juniper Moon Aran.

I decided to work the poncho from the top down. I enjoy working in this manner, and it’s easy to try the garment on while in progress ( or it would be, if the intended recipients didn’t live 250 miles away. ) I started with the collar, in Noro Silk Garden, and in garter stitch, and then joined the work into the round when the collar was long enough. The body of the poncho was then worked as if I was knitting a raglan sweater, working eight increases on every alternate round. When the ‘sleeve’ section was long enough, I ceased increasing in these sections, and just continued with four increases in the Body sections every alternate round. I then continued in this manner until the poncho was the desired length, minus the border. I decided to work some short rows on the Back and Front borders to give some extra detail, but it could equally well be worked as simple garter stitch. I used a stretchy cast-off, in this case, the Russian Cast-Off, to create a nice edge.

Yarn requirements
Child (10year old) size:
4 x 50g balls Noro Hanabatake
250g Aran weight yarn, so effectively 3 x 100g balls/skeins
Adult size:
5 x 50g Noro Hanabatake
300g Aran yarn
Tension: 18sts and 25 rows to 10cm/4ins. 

Pattern will be available soon.


As ever, knit on!
Lesley

Debbie Bliss Rialto Luxury Sock

We’ve been working with Debbie Bliss Rialto Luxury Sock which comes in a large, and exciting array of colors. It comes in 100g balls, and is 75% Super-wash Wool, and 25% Nylon.  The yarn we’ve chosen to work with is 04 Ultra, which is a gradient of different greens, ranging from quite dark to a lovely spring, leafy green.

IMAG1605

It was a slow start because I cast on the wrong number of stitches! I cast on stitches for knitting a thicker pair of socks, and was happily knitting along shaping the toe when I realized my mistake. So I had to rip out and start again. I like toe-up socks because it’s easy to try them on while knitting, and I can work an Afterthought Heel, of which there are many, but one of the simplest is shaped like the toe. Thus, they are a good portable project, or an easy project to work on while at knitting group, or watching television, as the heel is left until last.

I like to knit socks on two circular needles, and I am using size 2.5mm needles for these. Double-pointed needles or Magic Loop work equally as well, if you prefer either of these methods.  I used Judy’s Magic Cast On, which is so quick and easy, and makes a beautiful, seamless toe. I usually knit with metal needles, but it’s often a good idea to cast on small numbers of stitches with wooden or bamboo needles, as those materials are less slippy than metal, and the stitches are more likely to stay on smaller diameter needles. I cast on with wooden needles, work the first and trickiest rounds with them, and then switch to my favourite metal needles. I’m shaping the toe with Make 1 increases, but a simple knit in the front and back of the same stitch could be used.

I have small feet, so I cast on 20 stitches, 10 on each needle. I then knit one round, and then began to shape the toe, thus:

Round 1  (Increase Round ):

First Needle:       K1, M1L, knit to last st, M1R, k1

Second needle:                K1, M1L, knit to last st, M1R, k1

Round 2:              Knit all the stitches on both needles.

I’m going to repeat these two rounds until I have 56 or 60 sts. I will try on to see what number of stitches fits best. After that, it’s plain sailing with stocking stitch until the foot measures 2 inches     (5cm ) less than the length of my foot.

Here is the toe in progress. The socks will probably be a project that I take my time over, knitting a few rounds when I want some simple knitting to do. I will post progress in future blogs.  I’m hoping that I will be able to do a tutorial on Judy’s Magic Cast On in the future.

Wendy D. Johnson has written two great books on toe-up socks: Socks from the Toe Up and Toe-Up Socks for Every Body. These books look at all the techniques required for toe-up socks, and should be available in libraries, if you don’t want to buy a copy. Wendy covers different cast-ons, types of toes, heels, and stretchy cast-offs. Most good, general sock knitting books also cover Toe-Up socks.

Please contact me if you have any knitting queries, or specific questions about this post.

In the meantime, knit on!

Lesley